This Project has gone too long and decided to completely change it modernize it some more.
Keyboard
Going to use a Bluetooth Keyboard instead of the rewired Keyboard. No matter how I tackle the Rewired Keyboard I can’t get all of the functions I need and want. So now I’ll use a Bluetooth Keyboard that I bought last year on clearance. It’s made for a 7inch Tablet but it’s mostly a full sized QWERTY Keyboard layout. However this will take some work such as bondo and fiberglass work.
Video
This put up a big fight as well. The plan was to reuse the CRT and use a Modified B&W TV board for the Video Display. I ended up buying a 5inch LCD open frame kit. It has VGA, HDMI and Composite Video.
Mainboard
As much as I want to use the Omega2 I just need to cut that loss and just toss in a Pi. Instead of the typical Raspbian image I’ll use a special slim down one that doesn’t have X11 on it since I want it as a straight CLI (Command Line Interface). Also the Pi already has a TTL/RS232 pins to use for snooping in devices, not to mention Bluetooth and WiFi.
Addons
I’ll still have the Multi Memory Card Reader but I will also toss in a powered USB Switch. Might also toss in a PogoPlug to use as a Local NAS for even more extra storage. Just to a P2P connection via Ethernet.
Power Supply
Sticking with the Laptop Charger and Buck Convertors. I’ll only need a 12 Volt rail and a 5 Volt rail. I might toss in a Voltage Divider off the 5 Volt rail for in case I ever need a 3.3V rail for powering a device. I was thinking to toss in a small LM317 circuit to add a adjustable Power Source on the back of the unit but I don’t think I would need anything higher then 5 Volts so I’ll just add some Banana Jacks on the back and tie them into Ground, 5 Volts and 3.3 Volts. I can use the second Power switch I had already installed to turn on and off those outputs.
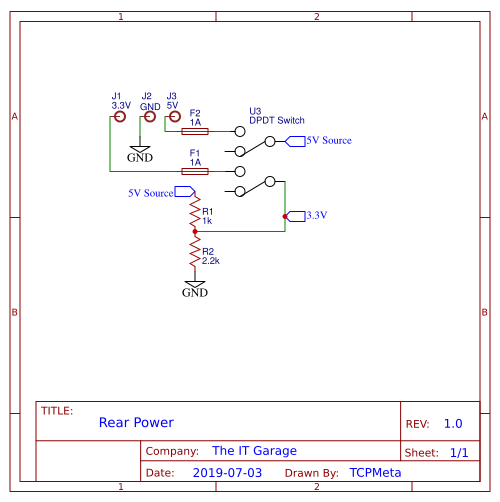
I could be a total bad ass and use Relay switching and the Pi’s GPIO but since I already have a switch there might as well use it.
Granted all of this has been done to death by others, maybe not the same project but using a Raspberry Pi in general. However in the long run I can easily upgrade and add on other features.
